
What lurks behind the door of a walk-in cooler box can be really scary. The messy environment was notoriously written about by Anthony Bourdain in Kitchen Confidential. Many food containers are wet or dripping, frequent spills occur, and large pallet jacks, crates, or kegs are dropped or dragged across the floor daily. Temperature fluctuations constantly occur every time the door stays open for a bit and then suddenly closes. All of this activity over time will wreak havoc on the flooring of the walk-in cooler or freezer.
Since a walk-in cooler or freezer holds all your perishable food and beverages, it is one of the most critical spaces to maintain in commercial food service establishments. Many walk-in cooler boxes are installed with a diamond-tread metal or quarry tile insulated floor, however, they can be easily damaged in a short period of time depending on the level of foot traffic and abuse.
Do walk-in coolers or freezers need an insulated floor?
An insulated floor is important to maintaining food products in colder temperatures. Typically a layered floor is installed in a walk-in cooler or freezer to maintain optimal refrigeration temperatures so perishable foods won’t spoil. The typical flooring installed in commercial walk-in cooler boxes are sheet metal, quarry tile, or possibly concrete. Over time the repetitive wear and tear on these surfaces can cause the flooring to buckle due to liquids making their way under the metal or cracking the tiles or concrete slab. This is a sign that water has reached the subfloor and is freezing which is causing expansion in the floor and breaking the layers above it.
When the leaking issue remains unresolved, condensation can cause more extensive damage to the layers under the flooring and potentially leak into the rooms below in a multi-level environment. Once condensation forms and the floor is damaged it is nearly impossible to keep clean and creates an environment where mold grows.
How do you insulate a walk-in cooler floor?
The best-insulated approach to insulating a walk-in cooler floor so that it maintains temperatures and reduces moisture is through layering. This begins with a subflooring like concrete, then the insulation material is applied followed by plywood and the top flooring layer like aluminum panels or grouted tile.
Feature Flooring Insulation Technique
Feature Flooring offers a much more durable and waterproof option to metal or tile called JetRock.
Top: JetRock Flooring System
2 Layers: Plywood (glued & screwed)
Layer: 2-inch foam insulation
Base: Concrete subflooring

How to replace a walk-in cooler floor?
The installation of a replacement cooler box floor must be carefully managed since the current flooring damage is caused by underlying water leakage issues which are causing the floor to buckle upward or tiles to become loose or broken. Feature Flooring specializes in tackling the most troublesome flooring areas in your commercial kitchen which includes replacing walk-in cooler boxes through a 7-step JetRock epoxy installation process.
7 Steps to install JetRock epoxy
STEP 1: Remove the current damaged flooring and insulation down to the subflooring.

STEP 2: Remove all the finishes and leave the metal cooler box and the concrete subfloor.

STEP 3: A new insulation barrier is layered. It will range in thickness depending on the size and temperature of the cooler box.

STEP 4: A pre-sealed plywood is installed to fit the dimension of the cooler box.
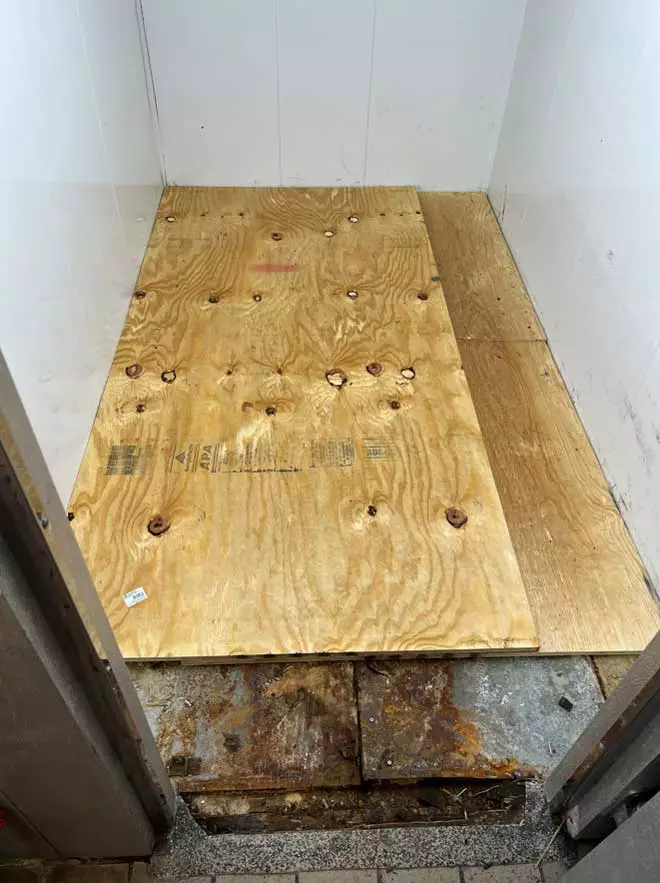
STEP 5: Two layers of plywood with overlapping seams are installed to prevent shearing if weight is distributed unevenly.

STEP 6: The plywood is screwed, glued, and sealed before JetRock epoxy application.

STEP 7: Finish with the final layer of JetRock epoxy resin and let dry for 8 hours before resuming use of the cooler box.

Are there any post-installation tips for maintaining/cleaning?
Now that your cooler box is fully restored it is advisable to maintain it with cleaning and remove standing water in the cooler. Also allowing your whole cooler box to defrost once a year provides an opportunity to clean or maintain the cooling system, fans, and air vents.
How does JetRock Epoxy compare to other cooler-box flooring options?
| Example: 10’ x 5’ Box | Sheet Metal | Quarry Tile | JetRock Epoxy |
| Seems | 20 (+) linear feet | 100’s of linear feet | Seamless |
| Thickness | ¼’’ | ½’’ | 3/16’’ |
| Bacteria & Mildew Resistance | No | No | Yes |
| Time to install | One Day | One Day | One Day |
| Watertight seal | No | No | Yes |
| Durability & Slip Resistance | Very Durable & very little slip resistance | Less Durable & No-slip resistance | Very Durable & Great slip resistance |
How important are installation speed or watertight features?
JetRock offers the fastest installation for your cooler box. Our flooring experts can deliver and install your new commercial floor overnight so that your walk-in cooler or freezer can be fully operational by Noon the next day.
Only JetRock epoxy flooring offers watertight sealing and antimicrobial and antibacterial properties. Year after year your cooler box will remain watertight which is so important to eliminating mold growth and maintaining a clean and safe environment for your employees.
Are there other top benefits?
JetRock outlasts other commercial flooring options with a 10-15 year lifespan offering so many benefits to a commercial foodservice establishment:
Slip-resistant: The quartz chips in JetRock are bonded together in a special epoxy resin formula that creates a non-slip texture.
Highly durable: Able to withstand large food crates or kegs that get dropped onto the floor. The flooring also has a superior ability to withstand constant temperature fluctuations and is 3x’s stronger than concrete.
Low maintenance: With its watertight seal and nonporous surface, JetRock epoxy flooring is easy to clean, stands up to the toughest commercial requirements, and is virtually maintenance-free.
If you are looking to install a new or replacement flooring for your walk-in fridges, walk-in freezers, warehouse cold storage units, or beer and drink fridges, give us your worst area to improve first. It’s almost always the walk-in cooler or freezer flooring, so let’s connect soon to discuss your specific needs. The last thing you want to deal with is the ongoing, unnecessary expense to maintain your cooler box floor.